What a Professional Organizer Wishes Every Homeowner Knew Before Planning a Remodel
September 24, 2026
When you’re planning a remodel, it’s easy to focus on the big decisions: layout, finishes, fixtures, and materials. But some of the decisions that make the biggest difference in how a home feels day to day are the ones that determine where everything actually goes.
That’s where professional organizer Kari Lonczak, founder of Refine Organizing, brings a valuable perspective. Kari helps Seattle-area homeowners create spaces that are easier to use, maintain, and live in, and recently put that approach to work in her own kitchen remodel.
We invited Kari to share what she learned from the process and what she wishes more homeowners would consider before remodeling. From decluttering before you design to measuring what you actually own, her advice is a helpful reminder that a well-designed space should work for the life happening inside it.
Guest post by Kari Lonczak, founder of Refine Organizing:
All photos courtesy of Kari Lonczak of Refine Organizing, from her own kitchen remodel. This project was not completed by Harjo Construction.
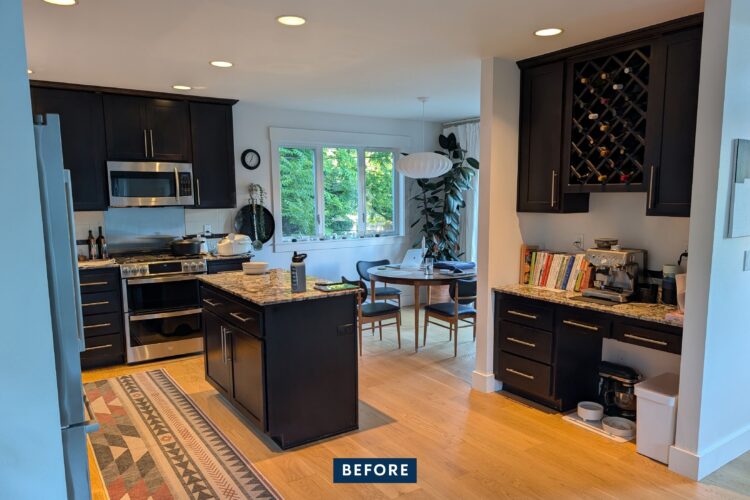
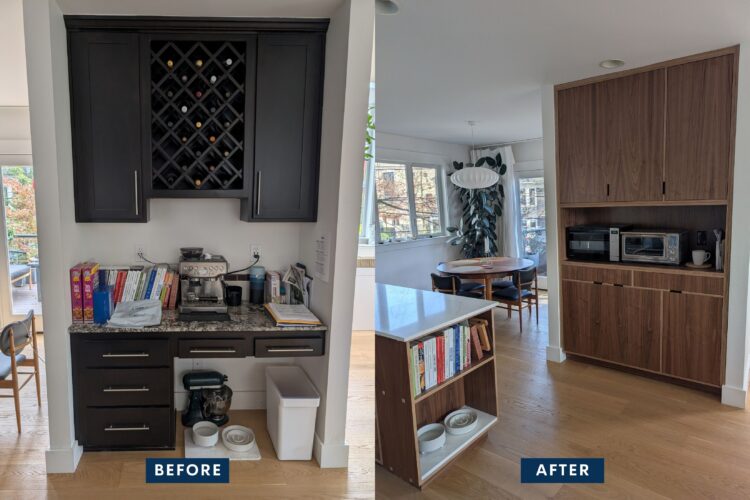
For nine years, our kitchen worked fine for us. Decent storage, a layout that made sense for two adults, nothing urgent enough to fix. But there were real gaps we’d been living around: an over-the-range microwave with a fan so weak it set off our smoke alarm nearly every time we cooked, no real pantry to speak of, and one dead corner in particular, a built-in desk nook we never used as a desk, with narrow upper cabinets and an oversized wine rack that ate up roughly a third of that nook’s real estate. Its crisscross dividers wasted so much of that space that most wine bottles couldn’t even fit in the slots, which is a rough trade in a small townhouse kitchen with no pantry to fall back on.
We lived with all of it for years because “fine” doesn’t create urgency. Then we found out we were expecting our first child, and those gaps stopped feeling like a list of minor annoyances and started feeling like an opportunity we couldn’t put off. A kitchen remodel with a newborn sounded like a hard no, so the timeline moved from “someday” to “now.”
I’m a professional organizer, and the way I approached our remodel came straight from the work I do with clients every day in our decluttering and organizing sessions: before you touch a single finish or cabinet door, figure out what the space actually needs to do for the people who live there.
Here’s a walkthrough of how I approached planning our remodel as a professional organizer who loves design and has seen plenty of examples of how kitchens do (and don’t) function for clients, their belongings, and their day-to-day lives.
The Process I’d Recommend to Any Homeowner
Here’s the order I actually worked through, start to finish.
1. Declutter First, Even If You Already Did
Before you plan a single cabinet, go through everything in the space again, even if you decluttered it last year.
This is the step everyone wants to skip. You’ve already been through your kitchen, so it’s tempting to assume you know what’s in there. What I recommend is a method sometimes called reverse decluttering: instead of asking “what should go?”, ask “what gets to stay?” It’s a subtle shift, but it changes the whole process. “What should go” puts you in scarcity mode, where every decision is a small loss and comes loaded with guilt. “What gets to stay” puts you in a place of abundance, where you’re intentionally choosing what earns a spot in your new kitchen instead of feeling like you’re getting rid of something. In my experience, people end up letting go of more this way, not less, because the decisions come easier when they’re not weighed down by guilt.
The easiest way to actually do this is by category, not by drawer or cabinet. Pull everything of one kind together, all your spices in one pile, all your pots and pans in another, and work through “what gets to stay” within that single category before moving to the next. It’s a more accurate read than judging items one at a time as you happen to come across them, and it sets you up perfectly for the next step.
2. Take Note of What You’re Keeping, by Category
Once you know what’s staying, write it down as a list of category groups, and pay close attention to anything large or oddly shaped that will need its own kind of storage.
For us, that list included a lot of spices, a handful of small appliances we wanted off the counter, a large dog food bin, cutting boards, sheet pans, an oversized paella pan, baby bottles and plates and placemats, tall vases, tall glassware, a small selection of alcohol and mixers, a large stock pot, our everyday pots and pans, utility-drawer items like scissors and sticky notes and a tape measure, and the electronics we charge daily, laptops, an iPad, our phones. Naming these specifically, instead of thinking in vague terms like “kitchen stuff,” is what makes the next few steps possible.
3. Write Down What’s Bothering You, and What’s Actually Working
Brain dump everything that frustrates you about your current setup, then do the same for what’s working. That second list is the one people forget, and it matters just as much.
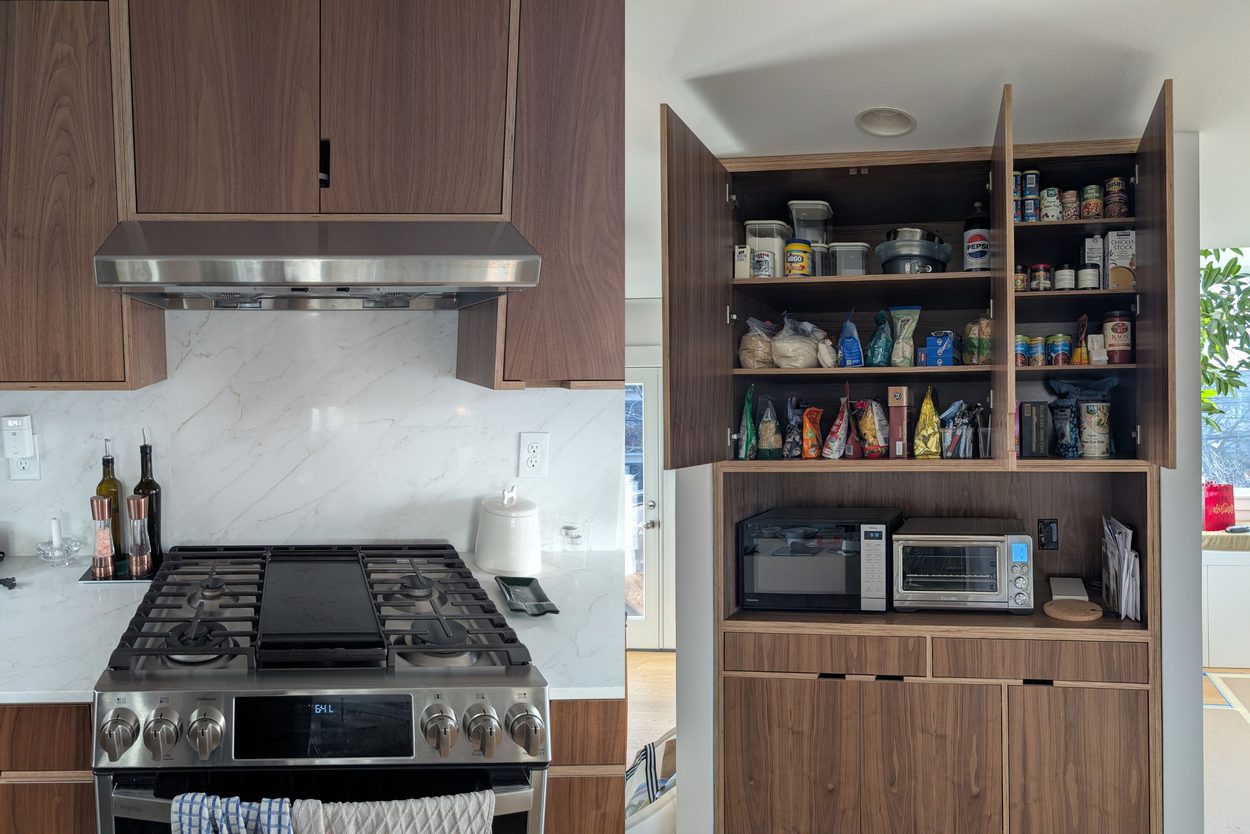
You want to keep what’s working instead of changing it just because everything else in the kitchen is. For us, what wasn’t working was specific: our over-the-range microwave had a weak fan that set off the smoke alarm nearly every time we cooked, which meant we needed a real range hood, which meant finding a new spot for a microwave that wasn’t above the range. We also had no real pantry and had been making do with a few narrow cabinets that never quite worked.
What was working: we loved our overall layout and where most of our items lived, even if some drawers and shelves needed tweaking. Our large single-basin sink was non-negotiable to keep. And I was never giving up my in-drawer knife organizer for a counter knife block.
4. Turn Your List Into Functional and Aesthetic Requirements
Take both lists and translate them into a prioritized list: what the space must do, and what you’d love if you can get it.
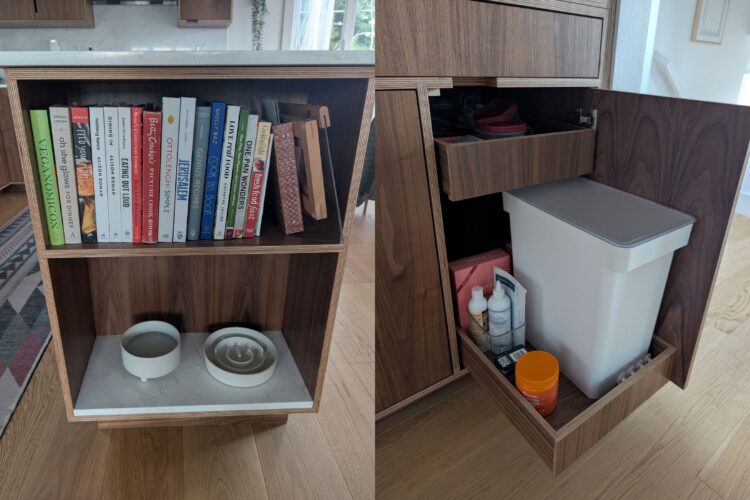
Ours included: somewhere for our dog’s food and water bowls that was accessible to her but out of the main walkway, a proper range hood, a new spot for the microwave, drawer dividers for the categories we used constantly (a spice drawer, and a utensil drawer with room for that knife organizer) without getting so specific it boxed us in later, somewhere to display cookbooks, real pantry storage for the first time, a place to charge our electronics, a pull-out for the dog food bin that made twice-daily feeding easy, and keeping that sink.
On the aesthetic side, we wanted a more modern look with walnut cabinets and a low-maintenance countertop, plus a coffee station. A nice-to-have: somewhere our toaster oven could live off the counter but still be easy to reach.
If you’re staring at a blank list, a few questions tend to surface what actually matters:
- What do you reach for every day that currently has no real home and ends up on a countertop instead?
- Is there a pet, hobby, or daily ritual — coffee, baking, a work-from-home setup — that deserves its own dedicated zone?
- What in your current kitchen doesn’t just annoy you but actively works against you, the way our microwave and smoke alarm did?
- Is there a category of item you own plenty of but genuinely have nowhere to put?
- When you look back through photos you’ve saved for inspiration, what keeps showing up: a material, a color, a layout?
- Which of your requirements are permanent, tied to a pet or a hobby you’re not giving up, and which are tied to a season of life that will pass?
5. Get a Rough Draft Down to Solve the Blank Page Problem
Once you have your list, get a first draft of a layout down on paper, even a rough one, because a blank page is the hardest part to get past.
This doesn’t need to be polished. Scratch paper works fine. The goal is to roughly map out where each category from your list would go and see whether it actually fits, then keep iterating from there. Having something to react to, even something messy, moves you forward faster than waiting for the right first idea to arrive fully formed.
That’s exactly how we landed on two of our favorite decisions. A rough sketch showed us that extending our island by just 12 inches would give us an upper shelf for cookbooks and a lower dog food station, both on our must-have list, without eating up walkway space. The same sketching process is what settled where the new microwave would go: into the wall pantry we built where that old desk nook used to be.
6. Nail Down the Details: Measurements and Drawer Inserts
As the plan gets more specific, measure the items that will actually live on your shelves.
How tall are your everyday drinking glasses? Your vases? How high can you comfortably reach without a step stool? Once our upper cabinet shelving was sketched out, I realized the shelves were taller than even our tallest glassware, which meant we could fit an entire additional shelf just by adjusting the heights. The same thing happened with our vertical pan storage: the cabinet was much taller than any sheet pan or cutting board we owned, so we shortened it and gained room for a whole extra drawer above it.
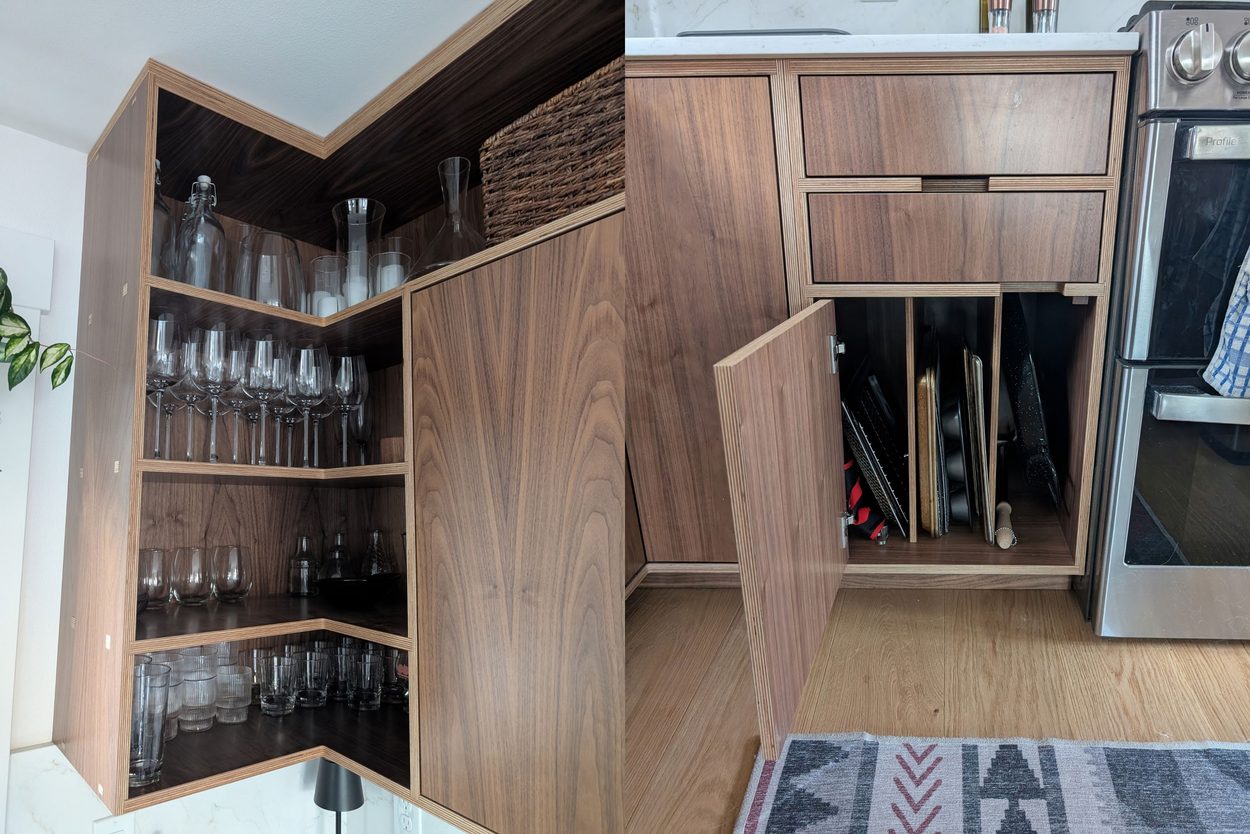
From there, decide on drawer inserts, and don’t go overboard. We only built in organizers for two drawers: one with spice risers, and one with general-purpose utensil dividers sized to fit that knife organizer. Everywhere else, we left the space open on purpose. A kitchen that works for you today should still have room to evolve as your needs change.
7. If You’re Packing, Set Aside What You’ll Need First
If the remodel means packing up the space, my biggest tip is to set aside a small pile of what you’ll need during the process and right when you unpack, before you pack anything else.
For us, that meant some utensils and glasses, paper towels, our coffee equipment and mugs, hand soap, a dish towel, and a few food storage containers. Pack everything else by category and label the boxes. Future you, standing in a half-finished kitchen looking for a coffee mug, will be grateful.
What I’d Tell Anyone Starting a Remodel
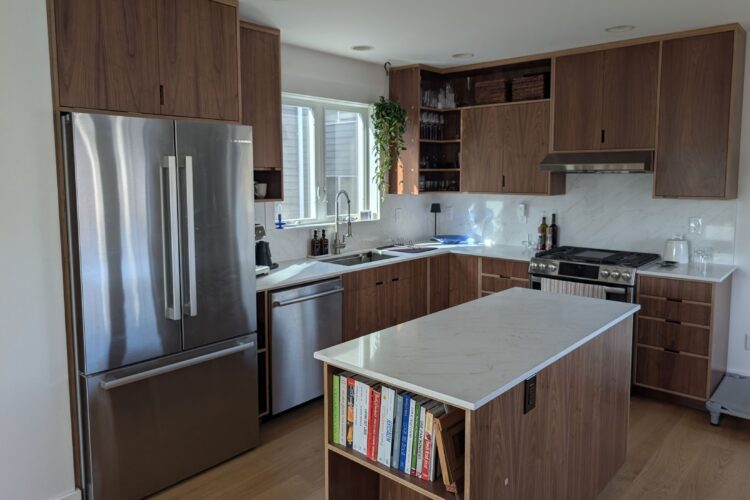
If I had to compress all seven steps into three things to hold onto, they’d be these:
Declutter before the remodel, not after.
It’s tempting to push it off until you’re unpacking into the new space, but decluttering into a kitchen that’s already built means you’re designing storage around things you’re about to get rid of anyway. Do it first, and let the new space get sized around what’s actually staying.
Measure what you own to get a general sense of scale, not an exact spec.
You’re not trying to build storage custom-fit to today’s inventory down to the inch, just close enough that you’re not wasting inches on shelves that are taller than they need to be, or leaving too little room for what you actually own.
Design for the life you’re building toward, but don’t shortchange the one you’re already living.
Make room for what’s coming, a nursery, a home office you’re finally committing to, a hobby you’ve been wanting more space for. Just make sure the daily basics still get solved too: where coffee actually gets made, where the dog eats, where mail lands before it turns into a pile. Aspiration should build on top of a kitchen that works for your real, everyday life, not replace it.
None of it takes a complicated process, just slowing down at the start, before the excitement of finishes and layouts takes over, to get honest about how the space is really used. Do that, and you end up with a kitchen that looks beautiful and actually makes your everyday life easier, the kind you’re excited to walk into every single day.

About the author: Kari is the founder of Refine Organizing, a Seattle-based professional organizing business. A certified KonMari Consultant with a background in software engineering, she brings a systems-minded approach to home organization, helping clients design spaces that hold up under real, everyday use. She writes Use It, Love It, Leave It, a biweekly newsletter about the small, specific decisions that add up to a home that works — you can find it and sign up at refine-organizing.com/newsletter.
Planning a Remodel? You Don’t Have to Figure It Out Alone
Kari’s approach is a great reminder to start with how you actually live: what you use, what isn’t working, and what you need your space to do.
But you don’t need to have the perfect layout—or even know exactly what’s possible—before you start a remodeling project. That’s part of what our designers are here to help with. We can take your priorities, frustrations, and ideas and help translate them into a space that works for your home and your everyday life.
Whether you’re considering a larger remodel or simply looking to improve the storage and functionality of your existing kitchen with new cabinetry, our team can help you explore your options.
Related Posts: